Friday, October 5, 2012

October/November 2012 Release Day Group Post

It's Release Day! All of our October/November 2012 release products are now available for purchase at www.wplus9.com. Don't forget, if we run out of something that you simply must have right now, you can also find Wplus9 products at many of your favorite retailers! Check our retailer's page for a list of where to find us.

If you missed the release, you can start here to catch up. And don't forget to check the winner's page to see if you were a lucky prize package winner!

Release Day is also Group post day. Release Day is reserved with one last parting project from each of the ladies that I get the pleasure of showcasing. And let me start by saying that the Design Team blew me away this month. A huge round of applause and MANY thanks to you!

From the color palette, to the perfectly placed elements, this card is amazing. I love how she pulled the red out of that patterned paper with the Label Layers 4 frame peeking out from behind.

I think it's obvious that I am a sucker for neutrals. Kerrianne's use of fabrics really keeps this card interesting and I think it fits perfectly with the genre of the images she chose.

I would have never come up with this combo, not in a million years, and I have to say I love it. I especially love how her entire focal panel mimics the shape of a house. So cute!

I can hardly ever wait to see what Elise does. She always comes up with the most creative, out-of-the-box ideas. Her shadow box is such a fantastic idea! And I love how she worked each of the figures from Iconic Christmas in.

Don't you just wish you could actually hang snowflakes on a line?! The glitter really makes this card and I'm just loving it!

Brilliant! Just brilliant! What a perfect trail of stardust/snow flurries Savitri has created. Another one I am lifting for sure.

Oh, how I missed Lea last release! Look at all of those layers and detail...and in such rich colors. I couldn't help but notice how perfectly chosen each piece is, right down to the card she has stamped the girl image onto.

Words can't express how grateful and honored I am to have had Anya join us for this release. Her talent is beyond measure, and her parting project is just further proof of it. Thank you so much Anya!

And that wraps up our October/November Release. I know I say this each release, but it's always worth repeating; thank you for all of your support!

Thursday, October 4, 2012

October/November 2012 Release: Full Reveal

It's time for the full reveal! Time to show you what we are releasing this month in their entirety. All products will be available for purchase at midnight, on October 5th at www.wplus9.com.

Folk Art Flurries

Details

  • is a 4x6 clear photopolymer stamp set
  • 14 high quality photo-polymer stamps; 13 snowflakes and snowflake builders, and 1 circle tag border image
  • will be available for purchase October 5th for $14

Pretty Patches: Christmas

Details

  • is a 3x4 clear photopolymer stamp set
  • 8 high quality photo-polymer stamps; 3 sentiment images, 1 heart and 4 sentiment builders
  • will be available for purchase October 5th for $6

Seasonal Sentiments

Details

  • 5 separate dies wired together that can be easily separated
  • (A) - 3 1/4" x 1 1/4", (B) - 2 5/8" x 1 1/16", (C) - 15/16" x 15/16", (D) - 2 3/16" x 1 5/16", (E) - 1/2" x 1/2"
  • will be available for purchase October 5th for $14

Clear Cut Stackers: Stars

Details

  • cuts 4 graduated stars in the following sizes: 4", 3", 2", and 1"
  • 4 separate dies
  • all but the smallest image is backed by a clear acetate backer
  • gently remove white backer paper on each die before use
  • will be available for purchase October 5th for $16

Iconic Christmas

Details

  • is a 6x8 clear photopolymer stamp set
  • 20 high quality photo-polymer stamps; 13 scene building images and 7 sentiments
  • will be available for purchase October 5th for $21

Iconic Christmas Companion Die

Details

  • 6 individual dies wired together that can be easily separated
  • coordinates with the Iconic Christmas stamp set
  • (A) - 2" x 3 1/16", (B) - 3/4" x 7/8", (C) - 1 1/8" x 2 1/16", (D) - 7/8" x 1 7/8",(E) - 9/16" x 2 5/8", (F) - 1 3/8" x 2"
  • will be available for purchase October 5th for $16

Simple Snowflake Die

Details

  • measures 3" in diameter
  • will be available for purchase October 5th for $9

Pretty Patches: Tree

Details

  • is a 3x4 clear photopolymer stamp set
  • 5 high quality photo-polymer stamps; 3 image builders and 2 sentiments
  • will be available for purchase October 5th for $6

Pretty Patches: Tree Companion Die

Details

  • 2 individual dies wired together that can be easily separated
  • coordinates with the Pretty Patches: Tree stamp set
  • (A) - 1 7/16" x 2", (B) - 5/8" x 5/8"
  • will be available for purchase October 5th for $5

Quilt Cuts 2 Die

Details

  • 3 individual quilt block patterns that are wired together and can be easily separated
  • each completed block measures approx. 2" x 2"
  • will be available for purchase October 5th for $16

Premium Card Stock

Details

  • 8 1/2 x 11" 100 lb. heavy weight card stock
  • acid and lignin free
  • available in packs of 15 and 30 sheets
  • will be available for purchase October 5th starting at $4

Kraft Pillow Boxes

Details

  • natural Kraft finish, perfect for altering, stamping, or wrapping with paper
  • Usable inside dimensions: 3.5 x 3 x 1; Outside dimensions: 4 1/4 x 3 x 1"
  • will be available for purchase October 5th in packs of 10 for $3

Natural Wafer Board

Details

  • 5 x 7" sheets
  • Kraft finish made of recycled paper
  • .022" thick and compatible with our designer dies
  • will be available for purchase October 5th in packs of 15 for $2

You all have been too kind this release! I have enjoyed reading all of your answers and can't wait for the Holiday season to begin myself. It is definitely my favorite time of the year! So, how about one more giveaway? Want to win the entire release? Including everything listed above. Just leave a comment by 10:00 PM EST TONIGHT October 4th to enter. I will select one random winner from all comments. Winners will be posted here by 11:00 PM EST. Good Luck!

***** Reminder*****

  • The store will be down from approximately 11:00 PM EST tonight until 12:00 AM EST while I upload and test all of the new products. Everything will be available and ready for purchase by 12:01 AM EST October 5th.

Wednesday, October 3, 2012

October/November Release Week Day 3

Can you believe it's day 3 of our October/November release already? If you are just joining us, you can start at Day 1 to catch up.

Today we are introducing the last of our stamps and dies that we will be releasing this month.

Pretty Patches: Tree

  • is a 3x4 clear photopolymer stamp set
  • 5 high quality photo-polymer stamps; 3 image builders and 2 sentiments
  • will be available for purchase October 5th for $6

Pretty Patches: Tree Companion Die

  • 2 individual dies wired together that can be easily separated
  • coordinates with the Pretty Patches: Tree stamp set
  • will be available for purchase October 5th for $5

Quilt Cuts 2 Die

  • 3 individual quilt block patterns that are wired together and can be easily separated.
  • each completed block measures approx. 2" x 2"
  • will be available for purchase October 5th for $16

So let's start out with Pretty Patches: Tree and the companion die. For my first card, I've paired it with Folk Art Flurries in a wintry blue palette.

I started by stamping a few of the snowflakes from Folk Art Flurries onto another new card stock color we are introducing this month, Lake House. For the focal point, I used the Pretty Patches: Tree Die. Instead of stamping the matching image, I added one of the smallest snowflakes in Versamark and top it with a couple of threaded buttons.

To create the backdrop for the tree, I cut 2 squares using the Clear Cut Stackers: Pinking Squares. I lightly sketched a hill onto the white one, trimmed it, and adhered it over the blue one. To finish, I add the sentiment from Pretty Patches: Tree on White card stock.

I really love the shape and scale of that die cut. But we can't forget the stamp. I'm really happy with the way this set turned out. I know it's a simple one, but I just love it.

The tree in Pretty Patches: Tree is 2 separate stamps, the tree and the trunk. And the heart, like the others in this series, is separate as well. All of the hearts are the same size throughout the series, so you can interchange the patterns and mix and match it any way you want to.

Notice the heart on the tag in the background? This is included in the Pretty Patches: Tree Die and works with all of the hearts in each stamp set in the Pretty Patches series! I thought the patches from Country Charm were perfect for creating a little patchwork background for these tags.

What is the perfect complement to Pretty Patches: Tree? How about Quilt Cuts 2? Yes, we have a follow up to the popular Quilt Cuts 1 die!

We did have a little drama with this die, so not all of the design team will have samples to show you. The first batch of these dies we received had an unusually high number of defective dies in it, and quite a few of the girls were affected. We have gone through the entire lot and tested almost every die to ensure that the rest of the shipments were not affected. Luckily it was isolated to the first batch. We also recalled and replaced the wholesale shipments that came from the original batch. So all is good now. And I'm so excited to show you these samples!

Like the original, Quilt Cuts 2 contains 3 separate quilt patterns, this time in squares. Here, I've paired it with a trio of trees from Pretty Patches: Tree, and more of that Simple Stories Handmade Holiday patterned paper.

This particular pattern cuts 8 triangles that can be arranged however you like. For my card, I decided to use them in the square pattern. The sentiment, from Pretty Patches: Tree, was added on a banner die cut using the Banner Trio Die. A little help with the checkered border from Country Charm was the perfect finishing touch.

Next, I wanted to show you how you can also use just bits and pieces of the patterns to create your own.

I cut several of the Nordic/FairIsle quilt square and just used the centers for this card. For a super quick way to adhere these, just dump them in your Xyron create-a-sticker. I used the left over border that you get after you die cut the patterns to help me space the shapes. I really liked the bold and graphic feel of this card, so I decided to continue with it and use the "joy" and snowflake die cuts from the Seasonal Sentiments Die for my sentiment.

Finally, I wanted to show what amazing focal points these patterns can make.

This might be my favorite card today. I just love how "comfortable" it is. Does that even make sense? Kind of like the comfort food of cards.

I die cut the quilt square 4 times, once from Oatmeal card stock and from 3 patterned papers. To create my quilt block, I cut a 2 1/8" square and covered it with adhesive, placed my border as a guide and then added the patterned paper pieces. The leftover pieces made a perfect border for the background.

I hope you have enjoyed all of the samples that we have shared this week. I can not tell you how much your comments and enthusiasm mean to me! And I know the Design Team feels the same way, they are dying to share some of their final projects with you as well:

Tomorrow is the BIG reveal! We will list and show all of the newly offered products in their entirety, including all of the details for our new card stock and alterable items.

But before you go, how would you like to win today's featured products: Pretty Patches: Tree, Pretty Patches: Tree Companion Die, and the Quilt Cuts 2 Die? Just leave me a comment by 9:00 AM EST October 4th to enter. I'd love to know what you'll be asking Santa for this year. I will select one random winner from all comments. Winners will be posted here.

Tuesday, October 2, 2012

October/November Release Week Day 2

Welcome back! It's Day 2 of our October/November release. If you are just joining us, you can start at Day 1 to catch up.

Wow! Did the Design Team turn it out yesterday or what?! If you haven't checked out their projects yet, trust me...you want to!

Today we have more to introduce, including 1 new stamp set, 2 new dies and a new card stock color. So let's get to it, shall we.

Iconic Christmas

  • is a 6x8 clear photopolymer stamp set
  • 20 high quality photo-polymer stamps; 13 scene building images and 7 sentiments
  • will be available for purchase October 5th for $21

Iconic Christmas Companion Dies

  • 6 individual dies wired together that can be easily separated
  • coordinates with the Iconic Christmas stamp set
  • will be available for purchase October 5th for $16

Simple Snowflake Die

  • measures 3" in diameter
  • will be available for purchase October 5th for $9

Today, we are jumping in the "way back machine" and going for a nostalgic holiday. Iconic Christmas is a true classic, filled to the brim with generously sized iconic Christmas images. It's just effortlessly elegant. My first two cards show off two of the main images along with their coordinating sentiments. Let's start with the Christmas carolers.

Here, I've stamped and die cut the pair of carolers and placed them under a lamp post. The trees in the background are also from Iconic Christmas. I've included three sizes of trees to accommodate a variety of applications.

The lamp post was decorated with the wreath also included in this set. Because you can't have a naked lamp post during the holidays, right?! I just added my sentiment and matted it with Cupid's Bow card stock to finish it off.

My next card uses the same layout, but this time I swapped the main images for the little girl and large Christmas tree.

I stamped and die cut the large tree and added it directly to the card base along with the sentiment. I then die cut and stamped the little girl and adhered her with foam dimensionals. For a little bit of interest, I added some snow flurries also included in the set across the background. I matted this one with Black card stock, which we will also be adding to the store this month.

I enjoyed the addition of black in the last card so much, that I decided to roll with it and do it again. And once I got started, I couldn't stop. I created a little card and ornament/tag ensemble.

This just might be my new favorite Christmas color combo. I know it's unconventional, but it just makes me smile. I started the card by stamping the large tree a couple of times across the bottom in Antique Linen Distress Ink. I then embossed a few snowflakes from Folk Art Flurries in white and inked around the edges in Antique Linen to bring out the detail.

The sentiment from Iconic Christmas was added in black and balanced on the left by a little lace, buttons and snowflakes die cut from the Seasonal Sentiments Die.

This little trio of tags would also make great keepsake ornaments. Add your To: and From: to the back along with the year, and the recipient could hang them on their tree.

To create the large square ornament, I used the 2.5" Clear Cut Stackers: Pinking Squares to cut a our Wafer Board and Black card stock. I adhered them together and then layered a 2.25" square of patterned paper on top.

For the center I die cut a snowflake using the Simple Snowflake Die and covered it with glitter. This snowflake is the optimal size at 3" in diameter. So versatile.

For the snowflake ornaments, I did the same. Cut one snowflake from Wafer Board and another from patterned paper using the Simple Snowflake die and adhered them together. Using Oatmeal card stock, I punched a 1.25" circle and stamped the sentiments from Iconic Christmas in the center using black Archival Ink and added the flourish also included in the set in Antique Linen Distress Ink. To finish, I covered the entire circle with glitter, added some May Arts twine to the back and adhered it to the snowflake.

I just love the way they all look together.

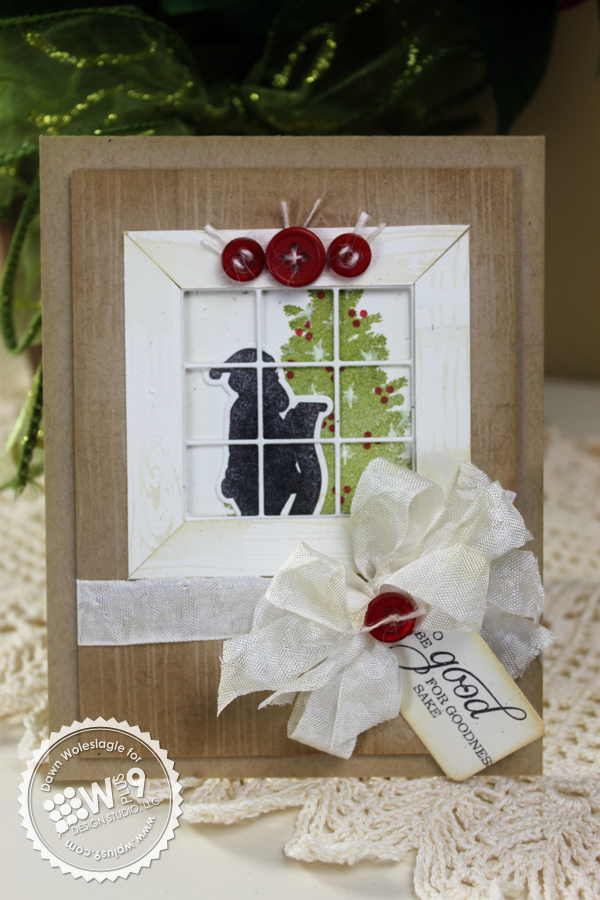
My last card for today, uses the image that started this set. It wasn't until after I finished illustrating this guy that I knew where this set was going.

Creating this one was actually very easy with the help of the Quilt Cuts 2 Die, which I will formally introduce tomorrow. To start, I used on of the quilt blocks to cut a square out of Kraft card stock. I cut another block from Oatmeal card stock, but instead of using the squares, I used the remaining frame for my window panes.

To create the window frame, I cut my "boards" and "mitered" my corners. I then embossed them with the woodgrain pattern from Woodgrain Silhouettes. To keep from burning my fingers with the heat tool, I temporarily adhered them to a card stock handle for embossing.

On the inside, I added the large tree from Iconic Christmas and decorated it with berries and a few twinkles of light with a white gel pen. I die cut and stamped Santa going over his list and added my sentiment using a Timeless Tags die cut secured with a bow.

And that concludes my samples and sneak peeks for the today. But I know that the rest of the Design Team has been having fun with these as well and would love to show you what they've been up to:

Thank you for the warm response to yesterday's previews. I hope we were able to keep the momentum going and that you enjoyed today's as well! Would you like to win today's featured products: Iconic Christmas, Iconic Christmas Companion Die, and the Simple Snowflake Die? Just leave me a comment by 9:00 AM EST October 3rd telling me what your favorite Christmas decor is to enter. Rustic? Homespun? Victorian? Elegant? I will select one random winner from all comments. Winners will be posted here.

Connect with us:

Follow Us on Pinterest